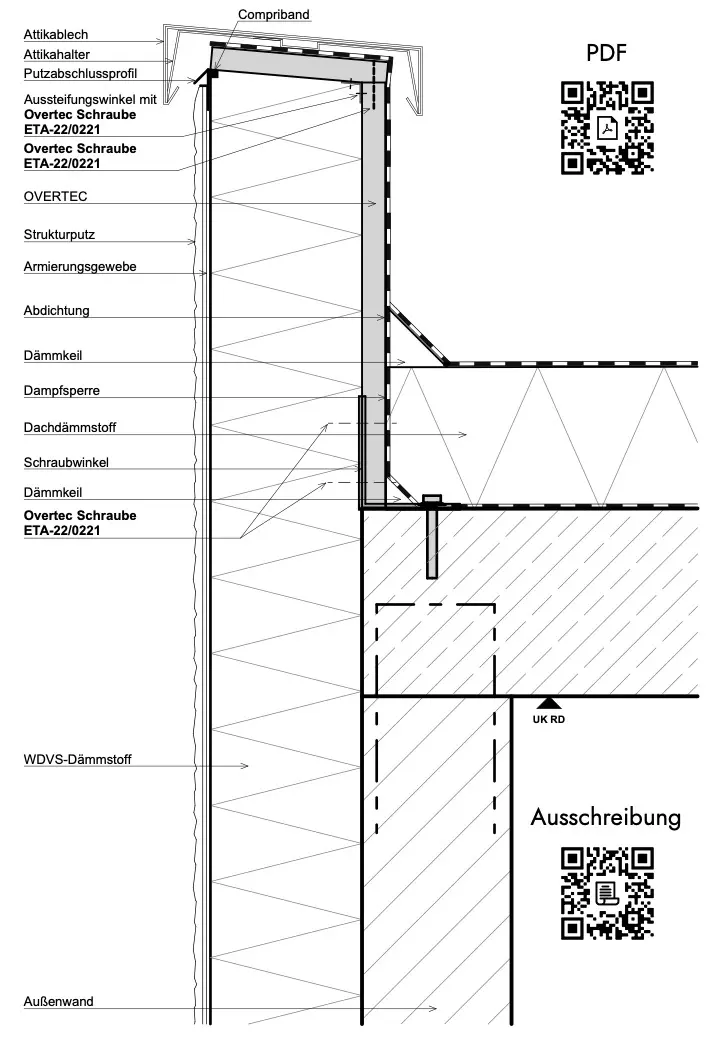
overtec Attika am Dach - aufgeschraubt

on concrete or wooden ceiling

overtec_logo-weiss

overtec Attika aufgeschraubt

is a single-shell flat roof finish that is screwed onto a concrete or wooden ceiling.

Overtec as a screwed-on variant is placed on the hardened concrete or on the wooden ceiling after the ceiling has been concreted and connected in a force-fitting manner. As a rule, the elements have to be moved by hand with two people.

diploma_certificate_certified_licence_patent_icon

Patented

approbation_approval_approved stamp_authorization_certified_icon

Authorized

recycle_sign_icon

EPD certified

The attic on the roof. In Germany since 2020.

Location-specific for your project and every attic installation situation.

Attika Dach
Attika Dach

The overtec Attika screwed on is the original on the market and is produced in Austria. The OneBit screw was developed by overtec to suit the system. This is optimized and approved for the panel material according to EN13986:2004+A1:2015. Likewise, only one bit is required for construction, which is on top of each screw box. The elements are connected with an alignment system that can accommodate panel expansion. All steel components are hot-dip galvanized on all sides and are rust-proof. The life cycle of an overtec is also recorded in the environmental declaration EPD and can be issued for your project. Our languageless installation instructions and videos support quick, safe and professional installation, without any prior knowledge

Attika am Dach Design
attika equipment

substrates

Everything starts out easy: the first steps when moving. on e.g.: concrete ceiling

Betondecke

Betondecke

60sec Video

Holzdecke

Holzdecke

Test the configurator and get clarity about the integration of the parapet on the roof.

Our configurator is the ideal solution for anyone planning to build a flat roof with an attic. With our 3D animations, we accompany you step by step through the entire flat roof construction. This allows you to track the exact structure of your roof and identify important interfaces. In addition, an overview of the connection of the parapet to the roof is created for all subsequent trades involved. By clarifying details in advance, we can ensure that no unexpected questions or complications arise on a construction site. Our solution ensures that you receive an estimate of the cost of the parapet and we invite you to request a free and non-binding quote.

Watch the 60 second video about building an attic on the roof.

Our assembly videos are shown using a QR code on all customer-relevant documents that the team comes into contact with on the construction site. By carrying out just a few steps correctly, successful construction is ensured within the specified schedule.

Do you need to set an installation budget and need precise timing for installing an attic on the roof? Contact us and we will go over the exact project requirements with you.

attika am dach
attika am dach
attika am dach
attika am dach
Sehen Sie hier ein aufschlussreiches Projektbeispiel

Our Motto: As few steps as possible.

We recommend that you take precautions for installing the parapet during the concreting process on the flat roof. The wet concrete ceiling is removed in the edge area. After the concrete has hardened sufficiently, the parapet elements are placed on the flat roof in the corners, aligned and connected to each other with overtec OneBit screws. The concrete screws, which are also included in the accessories package, are used to connect to the flat roof. Any differences in height are compensated for with plastic support strips. As soon as the second corner piece is built, an orientation line with a chalk line is drawn for the other attic elements on the roof. The elements are placed one after the other and work towards the middle, using the green alignment dowels to align the parapet elements. The last parapet is cut to size to fill the gap and is attached to the neighboring elements with perforated panels. A hand-held circular saw with a carbide saw blade is used for this. After installing the parapet, the cover panels should be attached immediately.

For architects and planners

The prefabricated attic detail for the flat roof structure

The attic detail on the roof is a detailed and time-saving solution for architects and planners in Germany who are planning a flat roof. It takes all important aspects into account, from the parapet sealing and insulation to the parapet sheet metal and the facade. With the intuitive drag-and-drop function, the parapet detail can be easily integrated into the plan and adjusted. Once integrated into your plan, you can customize the detail to suit your project needs. You are welcome to ask us about different file formats or download them directly from Ausschreib.de.

FAQ's

The parapet can be installed on various surfaces, provided that they are strong enough to withstand the loads of wind, snow and earthquakes. Common surfaces include concrete ceilings, which are still the most common, wooden ceilings, which are becoming more and more common on the market, and metal structures, which are used in special canopy constructions or hall buildings. This variety of fastening options ensures that the parapet can be used efficiently in different construction projects.

When screwing the parapet onto a concrete ceiling, the flatness of the concrete is the most important criterion. It is crucial that the concrete is leveled as horizontally as possible during pouring to ensure an even surface. The more precise the substrate, the faster and easier it is to install the overtec parapet on site. Special attention must be paid to so-called "concrete noses" at the end of the concrete ceiling, which often represent a slight elevation. These can be efficiently removed with a grinding wheel to create a flat surface for fastening.

Screwing onto a wooden ceiling is usually the most straightforward process. Once the flatness of the ceiling is ensured, there are no challenges with surface inaccuracies or the bumps that are common with concrete. However, it is still important to keep an eye on the flatness of the wooden ceiling. If the ceiling is installed with a slope, either intentionally or inadvertently, the top edge of the parapet must be adjusted accordingly. It is also crucial to know how thick the wooden ceiling is. Depending on the thickness of the ceiling, the appropriate screwing device is selected, or several angles must be used for particularly slim wooden structures.

When screwing onto metal structures, there are essentially two different scenarios to consider: Firstly, there is the case where supports are mounted at specific intervals. In this case, it is crucial to check whether these intervals match the pre-assembled angles of the overtec parapet. If this is not the case, the angle spacing of overtec can be adjusted to prepare the parapet to the exact required size. The second case concerns screwing onto a steel ceiling with continuous sheet metal. In this scenario, it is important to choose a screwing device that does not penetrate the material and ensures a secure connection to the metal substrate.

The parapet can generally be mounted on an Isokorb or an insulation element, but a number of factors must be taken into account. Non-load-bearing substrates such as insulation materials and Isokorbs cannot be used as substrates in the statics. Nevertheless, it is possible that the dead loads of the element are not transferred downwards, but via the angle construction. Our algorithm takes the dead weight of the Atatika panel into account in the statics calculation, which has a decisive influence on the choice of screwing devices, which are now also subjected to shear stress. It is also important for overtec to know whether the angle component is partially resting on the insulation material or the Isokorb. If this is the case, we can provide angle components with significantly longer cantilevered leg lengths.

There are several approaches to leveling out unevenness in the ceiling. Either the ceiling itself is adjusted, or the element mounted on it is positioned accordingly. If the subfloor cannot be changed, there are two effective methods to still bring the overtec parapet to a horizontal level. Firstly, the parapet angles can be supported with plastic discs. It is important to first determine the highest point of the ceiling and work from there. Secondly, there is the option of screwing the overtec parapet directly onto the uneven ceiling, then drawing a horizontal line on the overtec element with a chalk line and cutting the parapet back to the desired height. In this case, the parapet should be ordered with sufficient excess to have room for adjustments.

As a rule, a screwed-on parapet should not be supported by more than 10mm. When supporting, it is important to ensure that the washers are placed in opposite directions, both towards the edge of the ceiling and towards the middle of the ceiling, and not in the middle of the angle near the screw. This ensures that the angle can optimally transfer the pressure loads into the ceiling. This careful placement of the washers ensures that the stability of the structure is maintained and the loads are evenly distributed.

Overtec has worked with Hilti to develop the right screwing device for a wide range of overtec elements. For most products, we use the HILTI concrete screw/screw anchor 10x110. This screw offers optimal safety and ensures reliable fastening across a wide range of overtec products that are screwed onto concrete ceilings. With this solution, we ensure that our structures are robust and durable and offer our customers the certainty that their installations are firmly anchored.

The choice of screw for the parapet on wooden ceilings depends on the nature of the wooden ceiling. We adapt the screw material individually to the thickness of the wooden ceiling to ensure a safe and stable attachment. We supply the appropriate screw material according to the determined wooden ceiling thickness so that each installation is optimally adapted to the specific requirements of the ceiling. In this way, we ensure that the installation is not only reliable, but also durable.

A pallet usually contains around 20 parapet elements of the bolted variant, with each element being 1.25 metres long. This makes a total of 30 linear metres of parapet per pallet. However, the load varies depending on the height of the parapet and a pallet can weigh more than 1500 kg. If there are weight restrictions, for example due to a crane on site, please let us know. In such cases, we will be happy to adapt the packaging to your specific requirements to ensure smooth transport and safe handling.

The screwed-on parapet offers decisive advantages over the concreted-in variant. A key advantage is the flexibility in time management on the construction site. While the concreted-in parapet has to be manufactured after the ceiling formwork has been erected and before the reinforcement has been laid and the concrete has been poured, the screwed-on parapet allows for more relaxed scheduling, as it only has to be installed after the ceiling has been concreted. This significantly reduces the time pressure. The screwed variant also offers advantages when it comes to trade transitions. The roofer often takes responsibility for the parapet, so that the construction company can complete the shell up to the top ceiling and the roofer then installs the parapet. This flexibility and clear demarcation of responsibilities between the trades facilitates the construction processes and can increase overall efficiency on the construction site.

When screwing on the parapet, the vapor barrier can be penetrated. The function of a vapor barrier is to seal off the structure so that it is vapor-tight, which is different from sealing off water. It is possible to penetrate the vapor barrier at certain points, provided that it is sealed again at the point of penetration, for example with a suitable screw. In fact, a screw offers greater vapor-tightness than the vapor barrier itself. It is important that the angle of the parapet rests flat on the vapor barrier film to ensure that the structure is not damaged and that the vapor barrier's function is maintained.

When screwing on the parapet, the waterproofing must not be penetrated by water. It is important to consider certain aspects of how the waterproofing is bent or folded. For example, a two-layer bitumen layer must be broken over two 45-degree angles, while other foil waterproofing can be broken over 90 degrees. If the waterproofing is damaged, it is crucial to reseal it properly. For components that intentionally penetrate the waterproofing, such as railing connections, these penetrations must be sealed with liquid plastic. For more detailed information, we recommend contacting a specialist roof waterproofing company. In any case, the substrate of the screwed-on overtec parapet is ideal for primer and flame-cutting work on the surface.

The angles of the screwed-on parapet are made of S355 steel and have several laser-cut holes and a raised edge in the material. This manufacturing method is crucial because the optimal ratio between the vertical and horizontal angle legs is not 1:1 and there are no standardized L-angles that cover this ratio. Therefore, our angles are custom-made and specifically tailored to the static requirements to ensure maximum stability and functionality.

The surface finish of the angles on the screwed-on parapet complies with the normative requirements of EN1090 and EN ISO 1461. The components are provided with a hot-dip galvanized layer thickness of 100 micrometers, which means they offer optimal corrosion protection. This high-quality coating not only ensures that the specified standard values are achieved, but even exceeds them to ensure maximum safety and durability of the components.

The difference between whether the angle is attached to the inside or outside of the screwed-on parapet can be crucial depending on the installation situation. An external angle has the advantage that the external leg absorbs the weight of the panel, which relieves the screw. In addition, an external angle contributes to static stability, as the loads are not only transferred from the screws, but also directly via the angle. An internal angle, on the other hand, offers the advantage that it is completely enclosed by the seal, which ensures comprehensive protection against the effects of moisture. If a ventilated facade is planned, it is advisable to mount the angle on the inside and seal it with the seal to avoid long-term damage to the angle and screws caused by humidity.